So, you're diving into the world of Raspberry Pi SSH setup? Let's be honest here—this tiny yet powerful device has taken the tech world by storm. Whether you're a seasoned developer or a curious hobbyist, mastering SSH on your Raspberry Pi is like unlocking a superpower. Picture this: you can remotely control your Pi from anywhere in the world. Sounds awesome, right? In this guide, we’ll walk you through everything you need to know about Raspberry Pi SSH setup, breaking it down step by step so even a newbie can follow along.
SSH, or Secure Shell, is like a secure tunnel that lets you communicate with your Raspberry Pi without needing to physically touch it. Imagine you're on vacation in Bali, and you want to check on your home automation system powered by your Pi. With SSH set up, you can do that effortlessly. The best part? It's not as complicated as it sounds. Stick with us, and you’ll have your Pi up and running in no time.
Now, let's get one thing straight—this isn't just another tech article. We’re going to make this journey fun, engaging, and most importantly, easy to digest. By the end of this guide, you'll have a solid understanding of Raspberry Pi SSH setup, and you'll be ready to take on more advanced projects. So, grab your favorite beverage, sit back, and let's get started!
What is Raspberry Pi SSH Setup Anyway?
Alright, let's break it down. SSH stands for Secure Shell, and it's basically a protocol that allows you to remotely connect to your Raspberry Pi from another device. Think of it as a secure bridge that lets you send commands, transfer files, and manage your Pi from afar. It’s super useful for tasks like monitoring systems, automating processes, or even running servers.
Here’s why SSH is such a big deal:
- Security: SSH encrypts all communication between your device and the Raspberry Pi, keeping your data safe from prying eyes.
- Convenience: You don’t need to be physically near your Pi to manage it. As long as both devices are connected to the internet, you’re good to go.
- Flexibility: SSH works across different operating systems, so whether you're using Windows, macOS, or Linux, you can still connect to your Pi.
Now, before we dive deeper, let’s clear up a common misconception. Some people think SSH is only for advanced users, but that’s not true. With the right steps, anyone can set it up. Ready to learn more? Let’s move on to the next section.
Why You Should Care About Raspberry Pi SSH Setup
Here’s the deal—Raspberry Pi SSH setup isn’t just a cool feature; it’s a game-changer. Whether you’re building a home server, running a media center, or experimenting with IoT projects, SSH makes your life easier. Here are a few scenarios where SSH comes in handy:
1. Managing Remote Projects
Let’s say you’ve set up a weather station using your Raspberry Pi. With SSH, you can check the latest data, update software, or troubleshoot issues without leaving your desk. It’s like having a remote control for your projects.
2. Automating Tasks
If you’re into scripting and automation, SSH lets you run commands on your Pi from anywhere. For instance, you could automate backups, update software, or even restart services—all without physically touching the device.
3. Learning and Experimenting
For beginners, SSH is an excellent way to learn about networking and security. It’s hands-on experience that’ll come in handy for more advanced projects down the line.
So, whether you’re a tech enthusiast or a professional, mastering Raspberry Pi SSH setup is a valuable skill. Let’s explore how to get started!
Step-by-Step Guide to Raspberry Pi SSH Setup
Alright, it’s time to roll up our sleeves and dive into the nitty-gritty of Raspberry Pi SSH setup. Follow these steps carefully, and you’ll have SSH up and running in no time.
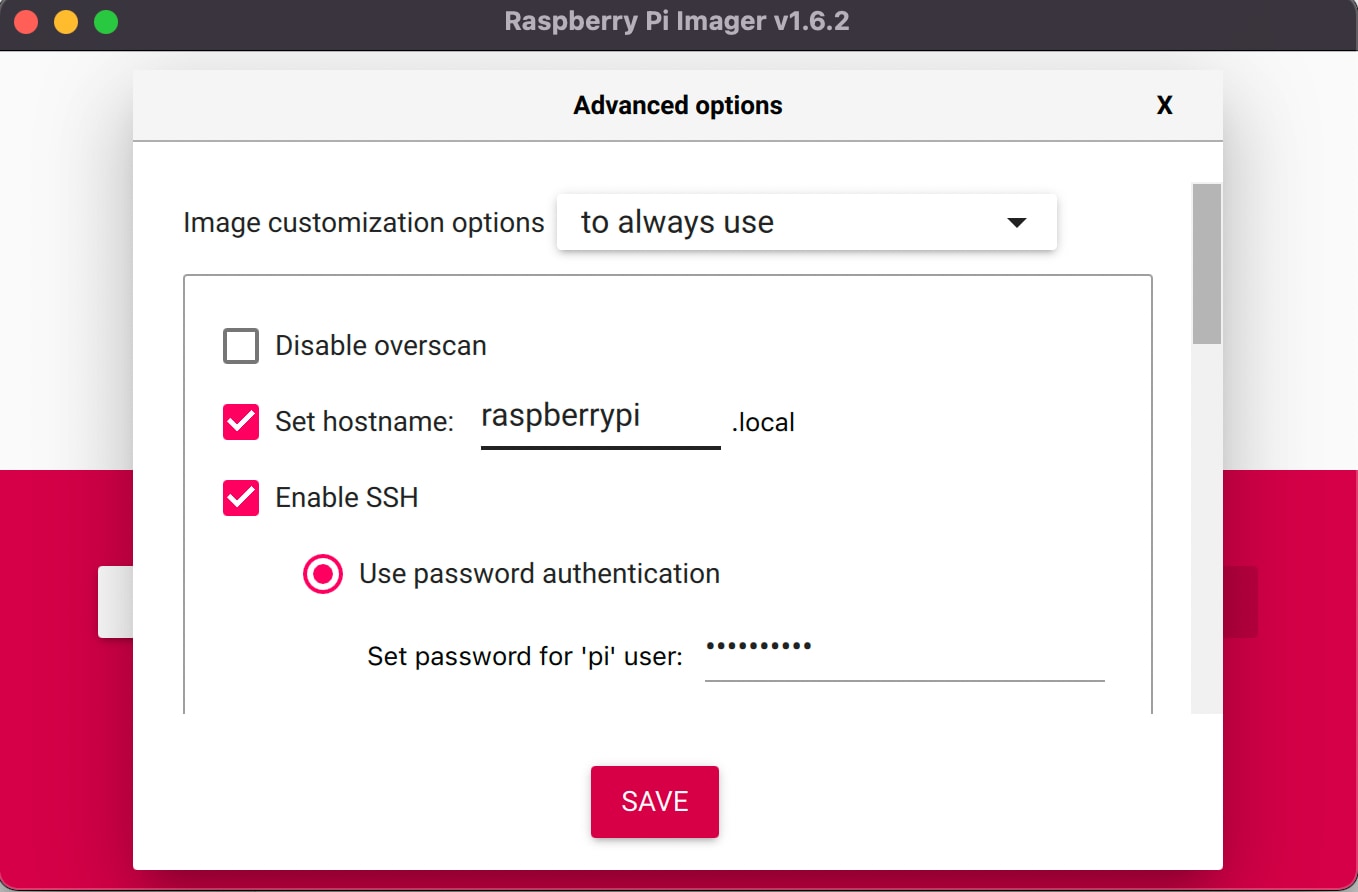
1. Enable SSH on Your Raspberry Pi
The first step is enabling SSH on your Raspberry Pi. Here’s how:
- Boot up your Raspberry Pi and log in.
- Open the terminal and type
sudo raspi-config. - Use the arrow keys to navigate to
Interfacing Optionsand press Enter. - Select
SSHand enable it. - Reboot your Pi by typing
sudo reboot.
Voilà! SSH is now enabled on your Raspberry Pi.
2. Find Your Pi’s IP Address
Before you can connect to your Pi, you need to know its IP address. Here’s how to find it:
- Open the terminal on your Pi and type
hostname -I. - This will display the IP address of your Pi, usually something like
192.168.1.100.
Make a note of this address; you’ll need it later.
3. Connect Using an SSH Client
Now that SSH is enabled and you know your Pi’s IP address, it’s time to connect. Here’s how:
- On your computer, open an SSH client. If you’re using Windows, PuTTY is a popular choice. On macOS or Linux, you can use the built-in terminal.
- Type
ssh pi@and replacewith the IP address you noted earlier. - When prompted, enter the password for your Pi (the default is usually
raspberry).
Boom! You’re now connected to your Raspberry Pi via SSH.
Troubleshooting Common Issues
Let’s face it—things don’t always go as planned. Here are some common issues you might encounter during Raspberry Pi SSH setup and how to fix them:
1. SSH Not Working After Enabling
Problem: You enabled SSH, but it still doesn’t work.
Solution: Make sure you rebooted your Pi after enabling SSH. If the issue persists, double-check the SSH configuration file located at /etc/ssh/sshd_config.
2. Connection Refused
Problem: You’re getting a “connection refused” error.
Solution: Ensure your Pi and your computer are on the same network. Also, verify that the IP address you’re using is correct.
3. Password Authentication Failed
Problem: Your password isn’t working.
Solution: Try resetting your Pi’s password using the passwd command in the terminal. If you’re still stuck, consider reinstalling the operating system.
Remember, troubleshooting is all about patience and persistence. Keep trying, and you’ll get there!
Advanced Tips for Raspberry Pi SSH Setup
Once you’ve mastered the basics, it’s time to level up your skills. Here are some advanced tips to take your Raspberry Pi SSH setup to the next level:
1. Use Key-Based Authentication
Instead of using passwords, you can set up key-based authentication for added security. Here’s how:
- Generate an SSH key pair on your computer using
ssh-keygen. - Copy the public key to your Pi using
ssh-copy-id pi@. - Disable password authentication in the
sshd_configfile.
With key-based authentication, you won’t need to enter a password every time you connect.
2. Set Up a Static IP Address
Tired of your Pi’s IP address changing every time you reboot? Set up a static IP address to avoid this hassle:
- Edit the
/etc/dhcpcd.conffile and add your desired static IP settings. - Reboot your Pi to apply the changes.
Now your Pi will always have the same IP address, making SSH connections a breeze.
Security Best Practices for Raspberry Pi SSH Setup
Security is crucial when it comes to SSH. Here are some best practices to keep your Raspberry Pi safe:
- Change the Default Password: Never use the default
raspberrypassword. Create a strong, unique password for your Pi. - Disable Root Login: Root access is powerful, but it’s also risky. Disable root login in the
sshd_configfile. - Use a Firewall: Configure a firewall to restrict access to your Pi’s SSH port.
By following these practices, you’ll significantly reduce the risk of unauthorized access.
Real-World Applications of Raspberry Pi SSH Setup
Now that you know how to set up SSH on your Raspberry Pi, let’s talk about some real-world applications:
1. Home Automation
Use SSH to manage your smart home devices powered by your Raspberry Pi. Whether it’s controlling lights, thermostats, or security cameras, SSH makes it easy.
2. Web Server Management
Running a web server on your Pi? SSH allows you to manage it remotely, making it perfect for hosting personal websites or blogs.
3. IoT Projects
From weather stations to smart gardens, SSH is a key component in many IoT projects. It lets you monitor and control devices from anywhere in the world.
The possibilities are endless. Get creative and see where SSH can take your projects!
Conclusion: Take Your Raspberry Pi SSH Setup to the Next Level
And there you have it—a comprehensive guide to Raspberry Pi SSH setup. By now, you should feel confident in your ability to set up and manage SSH connections on your Pi. Remember, practice makes perfect, so don’t be afraid to experiment and explore.
Before we part ways, here’s a quick recap of what we covered:
- What SSH is and why it’s important for Raspberry Pi users.
- A step-by-step guide to setting up SSH on your Raspberry Pi.
- Troubleshooting common issues and advanced tips for securing your setup.
- Real-world applications of Raspberry Pi SSH setup.
Now it’s your turn to take action. Share this article with your friends, leave a comment below, or try out some of the projects we discussed. The Raspberry Pi community is full of amazing people and resources, so don’t hesitate to join in and learn more.
Happy tinkering, and see you in the next guide!
Table of Contents
- What is Raspberry Pi SSH Setup Anyway?
- Why You Should Care About Raspberry Pi SSH Setup
- Step-by-Step Guide to Raspberry Pi SSH Setup
- Troubleshooting Common Issues
- Advanced Tips for Raspberry Pi SSH Setup
- Security Best Practices for Raspberry Pi SSH Setup
- Real-World Applications of Raspberry Pi SSH Setup
- Conclusion: Take Your Raspberry Pi SSH Setup to the Next Level